
If you update your website with Mintox and have the Customers & Members component, you can enable online sign-up to your website's database of members.
Note: E-commerce sites with Mintox Orders (and related components) automatically create customer/member logins when a customer successfully completes their first order through the website. However, you may wish to open site membership up to prospective buyers too, or create a different, additional member group for members to sign up to.
The basic process is:
#1 Decide the purpose of the online sign up
-
e.g. add more users to your customer group
-
create and build a new customer/member group
-
build a newsletter base that integrates with your website membership
#2 Define the data you need on sign-up
#3 Ensure you have the infrastructure in place to manage the new group
-
do you need to dedicate staff time slots to maintaining the group?
-
are you ready to offer those members the benefits or features that they should receive upon signup?
-
have you created a Members Area for them on the website? - including a 'My Account' area so that they can update their details easily?
#4 Create the registration / signup form and test fully
#5 Put the form on your website and promote the online signup!
This article will focus on the fourth part of the process:
How to create the actual registration form, and how to test.
Setting up a registration form
a) Create a form
-
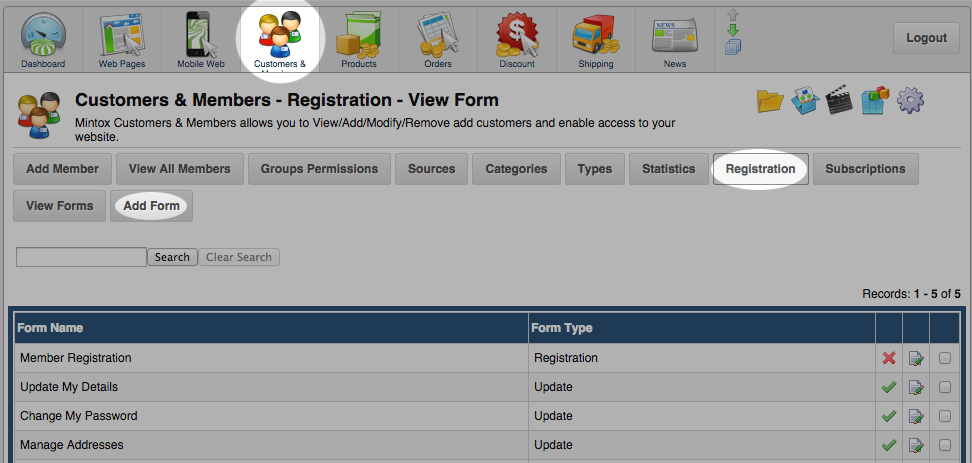
Open the Customers & Members component
-
Open the Registration area
-
Click Add Form
-
Form Name is for your reference only
-
Type: Registration
-
Description: (optional)
-
Tick Online
-
Save Form
b) Assign fields
Here you have a few field types available to create the form, and it's easiest to create in the order you want to save rearranging later.
First plan the form you require - you will already know the data you need as per Step B above.
Field Types:
-
Data Field - these are fields that correspond directly to those in a member's profile (visible in the Customer & Members View Member Profile area), e.g. First Name, Email, Home Phone etc.
-
Label - can be used as a label or header for an area of the form, e.g. to group different fields together
-
Long Text - as implied! Here you can create paragraphs/similar using the WYSIWYG editor - so you can add other objects like images into the form if required
-
Plugin - this can enable further form field functionality, usually a Multiple Address option (since eCommerce customers may want a Home and Work delivery address etc.)
When you're ready, you can assign fields to the form:
-
Click the Assign Field button
-
Choose your required Field Type and set up
-
Data Field: select the Component and field from the dropdown (e.g. Customers & Members > First Name) if
-
Replacement Name = Field name displayed
-
Error Message = the text displayed if the field is a required field but not completed correctly
-
Required = is the field mandatory?
-
Field Class Full? = should the field span the full width available, or take on normal form width style
-
Label:
-
Field Name is for your reference
-
Text is what will be displayed, usually in a Heading 2 format
-
Field Class Full? = should the field span the full width available, or take on normal form width style
-
Long Text:
-
Field Name is for your reference
-
Text - the content area
-
Field Class Full? = should the field span the full width available, or take on normal form width style
-
Repeat until you have created all your form fields, saving the form as you go (just in case!).
3) Assign actions
This is where you set what actually happens when someone signs up through the form you've created. Here are the main options:
|
Redirect to
|
Once the user has hit 'Submit', what page should load? Find that page and copy the URL here.
TIP: The My Account homepage you've set up in Web Pages is usually a good bet, if you enable Auto Login.
|
|
Auto Login
|
Once the new member hits 'Submit', Mintox will set up their account and can log them into the site straight away if you like.
|
|
Verification Email
|
Mintox can send a verification email to verify the new user. |
|
Send Email to
|
If you/your staff need to be notified when a new member signs up, you can select this and customise the email sent out, and to which address. |
|
Set Membership Status
|
This needs to be set. Suspended and Cancelled states don't make sense here, leaving:
ACTIVE = Member can immediately use the account once they've received their login details.
PENDING = You can manually approve their signup through the Customers & Members interface.
|
|
Set Member Group
|
This also needs to be set, along with a default group - since you can allow the member to sign up to more than one member group simultaneously. |
|
Subscription Receipt
|
(Only relevant for subscription and works in conjunction with the Subscription component) |
|
Send Email of Updated Field(s) to*
|
Probably the best way to automate your welcome message to the new member, whilst also providing them with their Login details.
TIP: Recommended.
|
| Synchronise Email and Username* |
This means the new member's username to log in to the site will also be their email address, which has two advantages:
It's likely to be unique, since email addresses have to be
It's one less arbitrary piece of information that the member has to recall / seek out when they want to log in to your site!
TIP: Recommended.
|
*When setting up your emails, don't forget to make use of the wildcard / personalised fields, displayed underneath the content area in the 'Fieldset' area. This way you can type something like Dear %firstname$ and the member will see Dear [whatever they entered as their Firstname].
Remember to Save the Form as you go, just in case!
Time to Test!
1) Set up the form on your website
-
Create a test web page and ensure you select for the page to be Hidden from the menu and the Sitemap
-
Add a Mintox Placeholder: Customers & Members > Registration Form > Select the Form you've just created.
-
All done. View the page online!
2) Look at the form
Does it look ok? Is the styling consistent with your site and the layout working?
Does it include all the fields you expected, and text?
If not edit accordingly, or contact Support and ask for help.
If this test passes, move on to the next:
3) Test the form functionality
Sign up using the form and an email address that you know isn't in your website's member database already.
Then check each of the functions you set up work as planned (assuming you set them all up):
-
Do you get logged in and redirected to the page you set?
-
Do you get emailed the Welcome email you created, and the notification email?
-
Remember to check the Communications component to see if emails were successfully sent from Mintox or not
-
Can you view and edit the data you entered by viewing the new member you signed up as in Customers & Members?
-
Can you login successfully with your new details?
Once you're happy, you can put the form on a public webpage on your site and promote it!